

Creating brand identities is such a great and rewarding experience. As designers, we strive to create the best brand identities we can, but sometimes things don’t go the way we want them too. And for that, we need to adopt a more disciplined process.
In this article I want to suggest you a way of doing things. A starter kit if you will. This is just one scenario out of many so take it with a grain of salt.
For this process, I will walk you through all the steps that I use to create a brand identity. I will showcase you a brand identity I recently created and explain each step that it went through.
Have you ever found yourself in a situation where you doubled or tripled your work efforts as a designer, without extra payment? Or even worse not getting paid at all? Or in a situation where your client’s demands exceed the scope of work by a mile and the project became a burden?
I know I did and this kind of experience it’s such a drag. Feeling undervalued, working my ass off and compromising quality was part of the soup. With each sip of this bitter experience, things needed to change. I felt the necessity to force myself in getting disciplined and follow a clear process that I can use to develop all of my branding projects. And so, I started writing down on paper all the required steps in order to minimize the risk of failure. I just couldn’t afford to fail that miserably, sacrifice quality, being frustrated and not be happy about the work I do.
Over time, I’ve changed the way I do things, hence the process I use to create brand identities. I continually improved each step until I found the discipline and mentality that worked for me. And I continue to do so. I would like to share with you a more in-depth view of my process, and hopefully you will find it useful or why not, steal it, adopt it, change it, build on it and eventually find your own way.
This article is divided into 2 parts: Client onboarding process & The creative process (10 steps)
First things first. What is a process? A process is a series of steps taken to achieve a particular goal. In the branding world, it’s the steps required to transform an idea in reality. In other words, giving form to a concept.
You know our mind is a fabulous place, where all these colors and images are born and then disappear, being absorbed and replaced by others. At times, the mind is playing tricks on us. For instance, we close our eyes and see how confident we are talking with the client, setting the price, how beautiful the logo that we’re about to create will be, how the brand identity is taking shape, how are we going to spend the future money, etc. In reality though, things are quite different. We make projections of everything, and this is where we have to stop, take a step back and think things through as objective as possible. And for that, all we need is a pen and a sheet of paper, to write the process.
Benefits
A well-designed process gives you a ton of benefits.
First of all, you set clear expectations for yourself and your client. He knows where his money is going therefore the risk of failure is reduced. Since the process is a series of steps, you can apply it repeatedly on all of your future projects, and all you need to think about is how to improve it with each opportunity. I am a firm believer that the process is the secret weapon that separates you from all the designers that barely possess it.
You have way more chances to get the job if you can talk about how the frack you’re doing your work. This knowledge is a confidence booster, and as designers, we NEED that, so the clients will understand that we know our shit well.
One other important thing is the inclusion of the client in the creative journey, where you gradually take the client by the hand and show him the anatomy of your process. This way you treat the work with respect, transparency, and professionalism. Here’s a familiar scenario: have you ever invested a ton of effort in creating the best logo and prepared small “surprises” for the great reveal of the project (in the hope that you’ll WOW the client) and the client’s reaction was, “NO this is not what we envisioned”? You don’t have to take that path anymore. Please continue reading; things will get clearer.
Side note: A typical scenario that many designers go through is having 3 logo versions and making the “great reveal” presentation. I am guilty of doing this before. Now I’d kick myself thinking about it.
Client onboarding process
01. The first client meeting
We can all agree that client meetings vary, so I will expose just a few points here.
I love talking to people and exercise empathy, and client talk is no exception. It’s the moment when both parts (you and your client) can connect and show their personality; it is a significant relationship binder. If possible, be there, be present and enjoy a good cup of coffee. This is the perfect moment to let your professional skills shine.
In each meeting, with every client, I have an agenda. It doesn’t have to be complicated. It could be a piece of paper, a notebook, a sketchbook, an app. It doesn’t matter as long as you have it with you. I do a bit of research regarding their business, their social media accounts, the decision makers, products, projects, etc. and I write down questions, observations and maybe some potential solutions for problems that I might find. This detective work helps a lot! Why? Because you can steer the discussion in different directions and gather more information about the business, the project, their needs AND make the client feel and see you are a good listener.
There are 2 things that I need to check off my list so I can say the meeting was a success. First, I talk about my process with moderate details (you don’t want to be boring) and second, I cover the budget. I need to know from the first meeting IF we are a fit. There is no time to waste time. I have a minimum engagement level that I apply to ALL the clients, and I don’t go below that, because it is a part of my process and client filtering. I also cover time estimations — how much time it will take me to execute the project, I always estimate 20–30% more. For more accuracy check out the 3 points estimation technique.
One thing is for sure, talking about the process enriches the conversation and puts you, the designer, in a better light.
My tip: takes notes in the meeting, otherwise essential pieces of information WILL get lost. By the end of the meeting, I let them know what the next step is- sending them a questionnaire so I can compile the creative brief or proposal.
02. The questionnaire
Oh man! that conversation was a blast! Such a good vibe and energy, the client is interested in working with me, and has the budget! Yaaay! Now what?
Well, it’s time to assess what exactly happened during that meeting. You need to clear the air and look over your notes and see what other information you might need from the client, to make the final offer. OK!
Now, you have to create a design brief. A design brief can metamorphosize in a lot of shapes and sizes, but we’re going to focus on a more straightforward approach. You can create a form using Google Form or if you prefer a more design-ish and elegant one, use Typeform. In the latter, you can personalize the appearance, use your logo and brand colors.
So, what should be in a questionnaire? Well, how about I give you mine? You can use this as a guide. These questions could be an excellent start.
Before anything, I send the form to my client and wait for the response. Sometimes forms are a pain in the neck and people are reluctant to complete them. Think about how frustrating is to complete all the fields and after an hour you click send. It’s like having the option to CTRL+S save your work, only after you finished it. Things can go wrong in the middle of the process, right? That’s why forms give a sense of urgency and humans want to get them done quickly. This will affect the quality of the information you expect to get.
My tip: craft your form based on the project you’ll work on. Keep the questions clear and informative.
After the results get in, quite often you’ll find that some answers are not good enough, or poorly written. Not a problem, get back to the client as much as it needs and ask for more elaborate answers and don’t proceed to the next step, only when you are satisfied with the answers. Clarity is the focus here.
My tip: I am stubborn as fcuk.
Finally, the answers are what they needed to be. We can go to the next step in the process.
03. The proposal or creative brief
You’ve had a lot of talking and writing. Now is the moment when you’ll have to put everything in a well-designed document. The aim here is to be as clear as possible because this document will serve as a guiding path for both you, and your client.
In your proposal, you need to cover:
- Personal presentation (or company and team)
- Your services
- Case studies of some of your best work
- The client’s project scope of work
- Questions and answers from the questionnaire
- Budget
- Deliverables
- Timeframe
You have built up this document, and now you send it to your client for approval. Usually, there will be a back and forth until everything is clear as day. The client might also negotiate the price.
One thing that is quite frequent on the client side is going beyond the scope of work. Remind the client about the current “Scope of work” if it’s necessary, finish what you started and after that discuss other deliverables. This happens to me more often than I want too and typically in the middle of the creation process the client tells me that he also wants a website and other marketing collaterals. A perfect moment to remind him that these are not included in the current Scope of work and will be discussed separately.
In any case, what I’m saying here should be treated as a guideline and with a grain of salt. For more details on how to build a proposal check out The Perfect Proposal from The Futur here.
04. Contract / Agreement
Thought of working without a contract? Think again! Get your contract ready. At least you are playing safe(er). I must admit I do have a reasonably strong contract that covers me pretty good and I’m not afraid to use it. One of my clauses is a 50% installment before starting the job. For me this is mandatory, so until I see the money in the bank, I don’t consider pushing even one pixel. I’m stubborn as fcuk (again). Also in the addendum or Plan of work, I add the Scope of work, deliverables, budget, and schedule, because…well…the client has to sign it.
My tip: I require 50% installment before starting the job and the rest of 50% before sending the deliverables. Notice the word “before.” If the project is relatively big, I use the 50–25–25 rule, meaning 50% upfront, 25% in an intermediate stage of the process, and the rest before the handover.
Got the money in the bank? Great! Now it’s time to get things rollin’.
Hey! Still reading?
The Creative Process (10 steps)
I will be showcasing a brand identity project that I created together with Mircea & Karina. The RoadPacker Group (RPG) is the leading chemical soil stabilization company in the industry, with distributors throughout the world.
View the following steps like a conversation between you and the client, while you are enjoying a cup of coffee. Here’s YOU (freelancer or team) explaining the process to your client. For the record, I chose “team,” because it has a sense of inclusion and added some additional project notes for context.
01. Research + pen and paper
a. Moodboards / Stylescapes
By using mood boards (or collages, if you will), we’ll be able to set the visual direction. Think of Pinterest.
b. Mind Mapping
We use this technique to pour out all our ideas into an organized fashion. There’s no good or bad, all ideas are put down as soon as they pop into our heads, and we can worry about organizing them afterward.
Just like a city map, our main concept is the center of the city, while the main roads stretching out from the center are equal to the key thoughts in your thinking process. You’ll also have smaller, secondary roads, which represent secondary thoughts; and so on.
Images or shapes are the landmarks of our city, just like particularly exciting or representative ideas.
c. Sketching
This is when we transform all our ideas into sketches. The goal here is to turn ideas visual in low fidelity.
Project note: In reality we’ve done a lot more sketches, 3 times as many. After this stage we filtered all the ideas, giving a rating to each idea that we thought was suitable.
Selection & PDF preparation
After pouring our hearts and creativity into our sketches, we will select between 8 and 12 of them, scan them, and prepare a PDF in a grid layout.
Don’t worry; we’ll have side notes that further explain the concepts and why these particular sketches were deemed the ‘winners’ in our eyes. Each proposal will have a reference number, so you can easily choose your favorites.
Duration
We know you want the best of our efforts, so please be aware the sketching phase can extend over several days. (3–5 days)
Project note: While drawing we make quick decisions, some logos have thin lines, some thick, some have a small size, some are big, some are hollow, some filled. In the presentation stage we redrew the selected sketches and refined them. The aim was to make them look consistent in line, thickness and size.
02. Review & Feedback / Phase 1
Based on the PDF you’ll receive, you will be able to review the selected concepts and give feedback that we’ll make sure to incorporate in the next step.
Don’t be shy, let us know what you really think! We love an honest opinion.
We recommend that you choose 4–6 concepts that can go in the digitization phase.
My tip: In this step, you might encounter delays. The client needs some time to take it all in. Be sure to adjust the calendar if needed.
03. [4–6] Digital proposals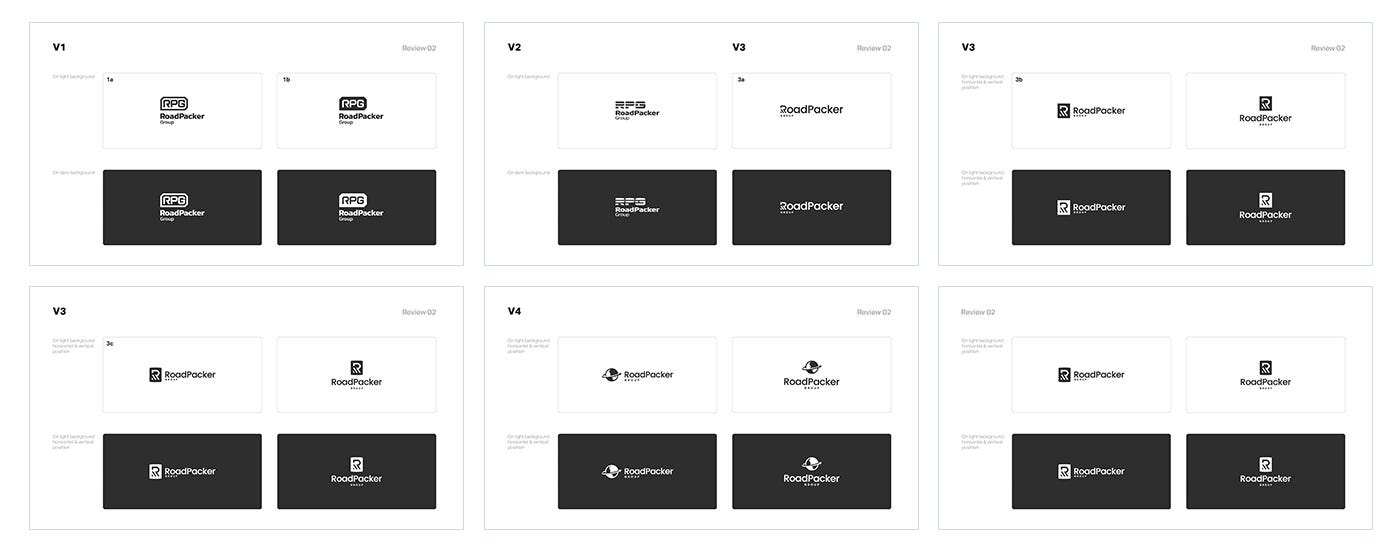
Each proposal from step 02 will be digitized. We will work primarily in black and white and test the logos in both black on white background, and vice versa. Don’t be alarmed by the lack of color; we’ll get to that a bit later.
My tip: stop the urge of thinking and using colors. Yes, at this point you might have an idea on what color scheme to use, BUT you don’t want the client to choose a weak version of the logo based on color.
04. Client Review & Feedback / Phase 2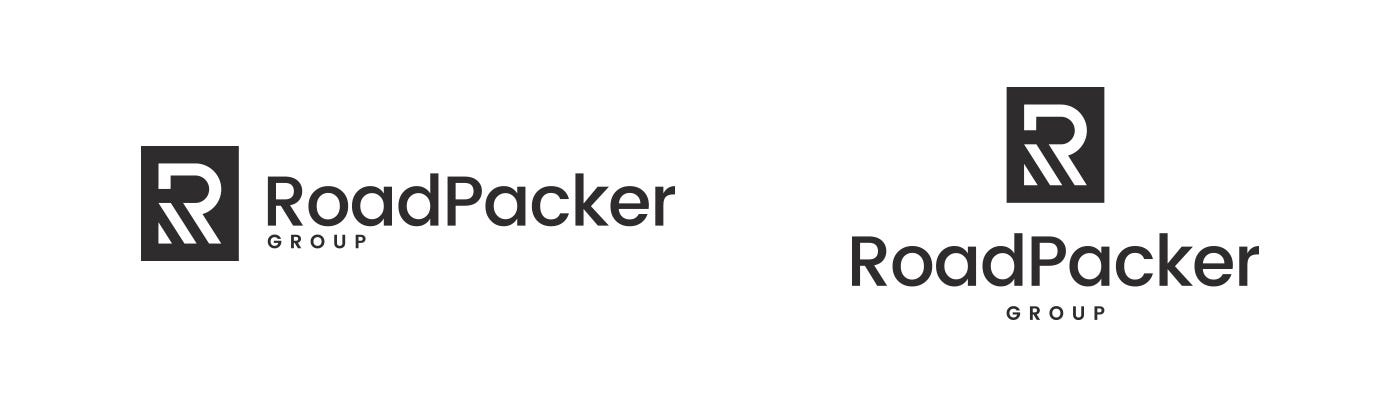
Once you receive the PDF from step 03, you’ll get the chance to choose “one” proposal for further development/iterations. We’ll make sure every little detail is as it’s supposed to be and each pixel is where it’s supposed to be for you.
My tip: In this step, like in Phase 2, you might encounter delays. The client needs some time to take it all in. Be sure to adjust the calendar if needed.
Project note: The client has chosen this version of the logo, both horizontal and vertical versions.
05. Final version iterations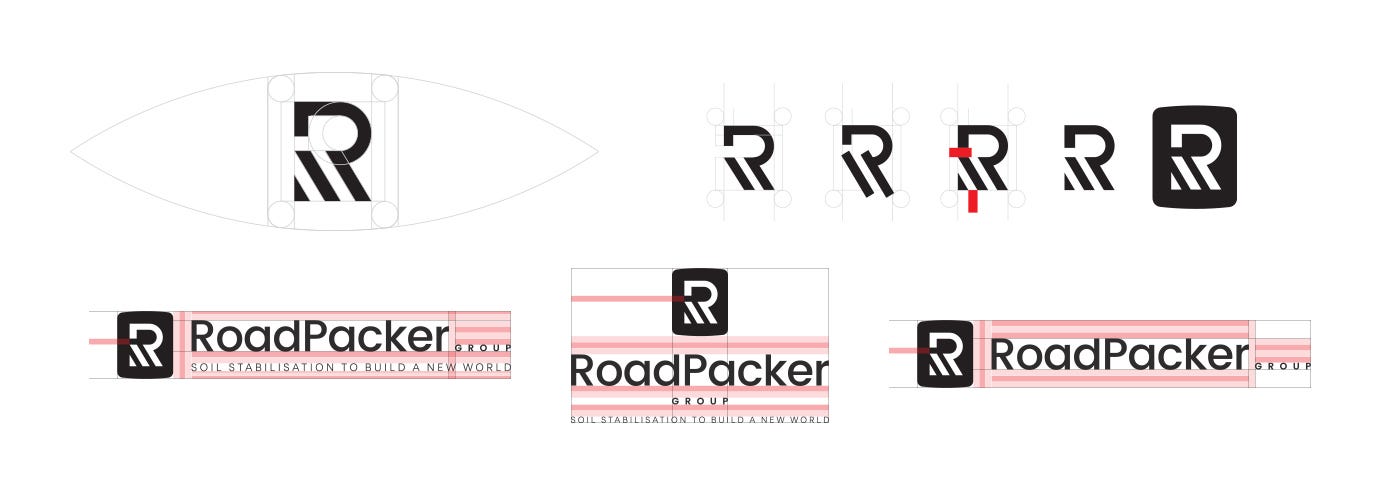
Based on the version that you’ve decided on, we will start iterating and prepare 5–7 iterations. We will arrange all versions in a grid system (just like we did with the sketches in section 01). You’ll have our side notes to help you navigate the minute detail variations that can make all the difference.
All concepts are presented in black and white. (Bear with us for a little longer, we promise there will be color.)
Project note: The image is just a small fragment of the actual iterations. We had many more refined versions, with a lot of differences some more noticeable some less. In this step we also refined the proportions, tracking, kerning and made some optical adjustments to balance the composition. The client gave a lot of valuable input in all the stages of the process that we took in consideration.
06. Client Approval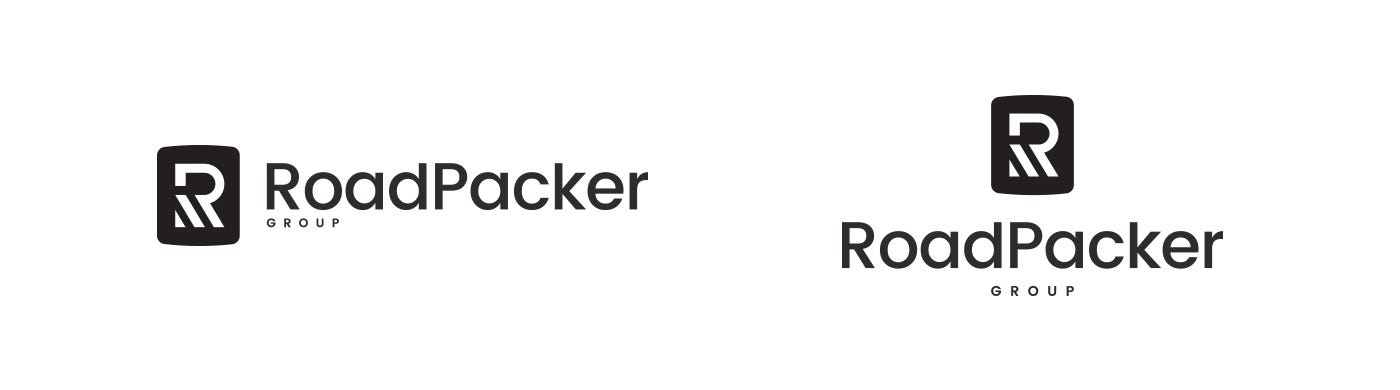
The moment you’ve been waiting for — you will choose the final version from all iterations in step 05.
My tip: In this step, you might encounter delays. Client gathers feedback from their peers, and they probably need some time to take it all in. So be sure to adjust the calendar if needed.
07. Choosing colors
See? We’re designers of our words. With the final version of the logo, we can now talk and select colors. We will propose between 2 and 5 color choices and prepare a PDF for you.
Project note: We knew that the client wanted blue as the primary color, but we wanted to try some additional options, just to make sure we cover everything. In the end we deliberated between 3 hues of blue and orange, after we tested how the color will be rendered on screen and in print.
08. Final presentation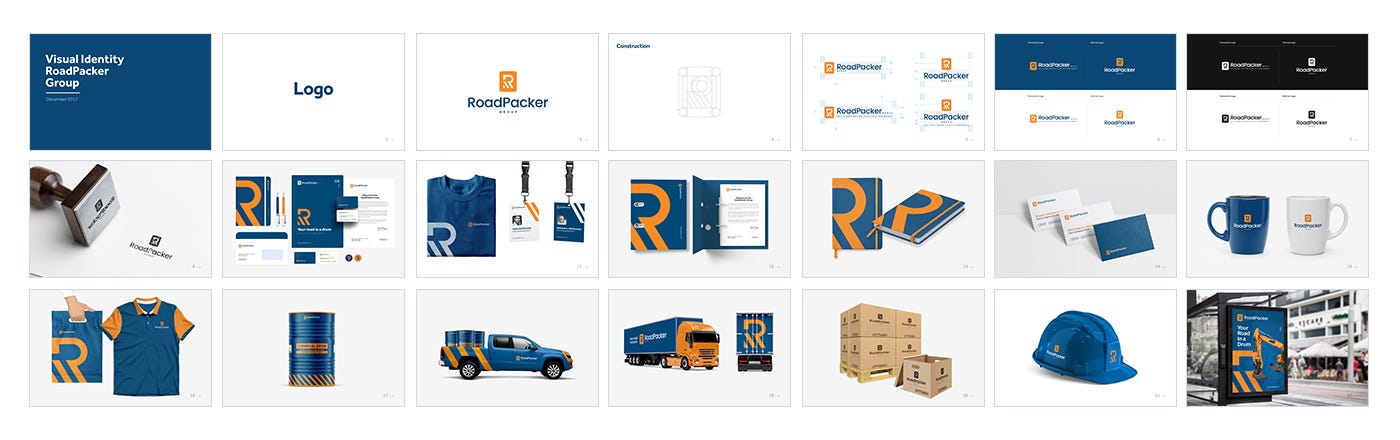
Wait! We’re not entirely done yet. With the final concept, we will prepare a small presentation that includes: Identity overview (how things look in a visual system); 3–4 pages of various applications (business cards, folder, banners, etc.)
My tip: I always give clients a bit more. I believe in “underpromise but over deliver.” This presentation will serve you well when you prepare the Brand guidelines manual.
09. Prepare deliverables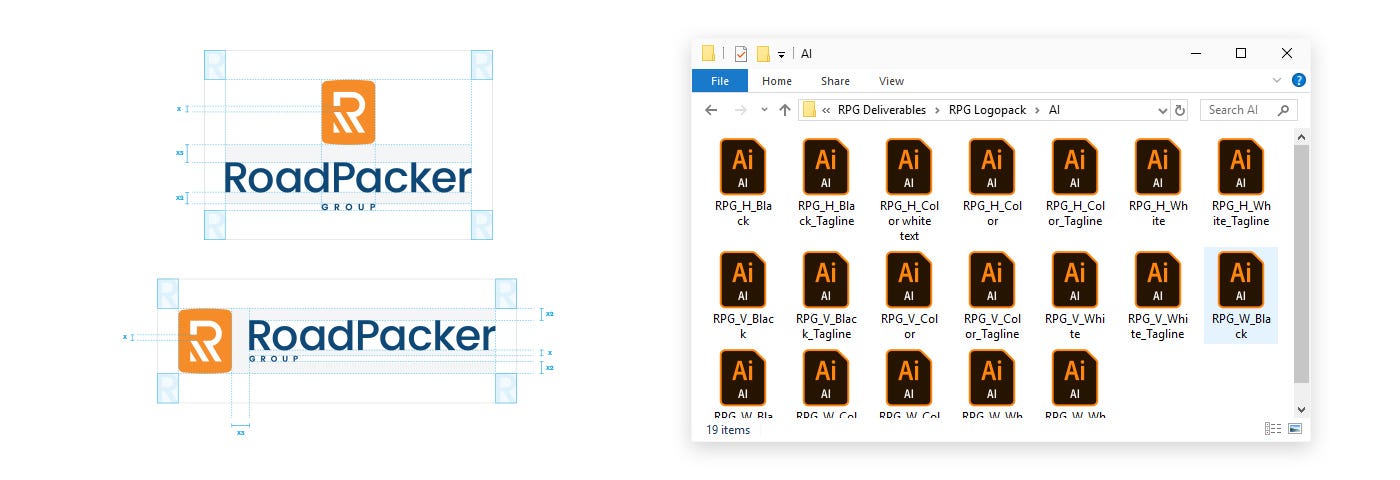
If you’d like to know exactly what you’ll be receiving regarding deliverables — we will create the following materials that will be delivered in digital format:
Logo Pack
ai, pdf, eps, svg, png
Guidelines manual
- Logo variations
- Logo construction
- Color codes
- Typography (and links)
My tip: I put everything in separate folders, making sure all of my files are appropriately named. Also, I include a “Thank you” note with my business info. This is optional of course.
10. Handover
It was a brilliant journey so far, but there’s one more step to take.
We hit the Send button with all the Deliverables to you. In fact, this can be done via email, as an attachment or via shareable link (Google Drive), or any other way you require.
Ending thoughts
And we’re done! That is a long journey, isn’t it? Actually, it’s not. You ensure the best quality you can provide and still keep your sanity. Imagine that a big part of this article was the actual discussion with the client. You just bought a TON of value into the conversation and clients will love you for that.
This process is just the tip of the iceberg, and I hope it gives you a more strengthened sense of discipline and what that implies. Write down your process and learn it well. Remember always to improve the ways you are doing things.
Related Articles
thank you.


No comments:
Post a Comment